Before you get rid those out-of-style sweaters you’ve been holding onto, consider making them into a snuggly bed for your pet.  One way is to make a pet bed by crocheting strips of old sweaters. Pick colors that look good together—that awful 1980’s mustard yellow should probably be avoided.  Visit a thrift store if you’re short on old sweaters.  Or if you only have ones that are mustard yellow.  No really.
DIY: Cardigan Dog Coat
 After a little stutter of snow yesterday, it’s actually snowing with some conviction here in our corner of the Pacific NW. Â So here’s a clever project that recycles an old, wool women’s cardigan into a cute coat for a smallish dog. A large men’s sweater would work for at least a mid-sized dog. Â Make sure you use a wool sweater, otherwise it won’t felt. Â Don’t have an old sweater around? Â Get thee to your thrift store and find one for cheap. Â Be sure it’s larger than your pup, because it will shrink when you felt it.
Felted knits handle more like fabric and are more durable.  (Here are a few tutorials on felting, in case you need them: this one covers both hand & machine felting, here is a printable one on machine felting, and another on hand felting.)
The tutorial has you fitting the sweater by pinning it while it’s on your dog. Â This seems like A Very Bad Idea. Â I think a better idea would be to mark the sweater where you have it pinched to take up the excess material. Â It might not be as precise, but you also won’t risk poking holes in your dog or yourself, which sounds much more pleasant to me. Â If you’re making one for a larger dog, I’d check the length of the sleeves before you cut them off.
So check out the tutorial and don’t miss the video that also shows how to make the cardigan dog coat. It can give you a better idea of how this project works.
DIY: Cat Toys From Felt Sushi Tutorial & Pattern
Felt sushi are perfect for kitties!  With a couple of modifications, this tutorial for felt sushi will make some awesome cat toys that would be fun gifts for the holidays.  One thing I’d change is instead of beads for the tobiko, use french knots with orange embroidery floss. They’ll still look good and will be safer.  And don’t forget to add some good catnip!
10 Emergency Preparedness Tips You May Not Have Considered
Catster has a terrific list of easy-to-do things that can help your pets get through an emergency and includes several tips I hadn’t considered. Â These are three I thought were particularly good.
- A Together Tag registers your pet in a national network  and  allows you to have multiple contacts listed.  This means you can have an out-of-state contact in the event that local calls aren’t going through.  Microchips are still important, but getting access to someone with a scanner may be impossible after a disaster.  The Together Tag is more insurance that you’ll be reunited with your pet.
- Scan or photograph the labels of your pet’s medication and upload to a photo-sharing site. Â Be sure to black out your personal information.
- Make detailed Emergency Instruction cards for your pets—include information on medications, food, who you want to have custody of your pet if your’re incapacitated or killed—and put the cards in a prominent place like the back of your front door.  Consider one for your wallet, so if something happens to you, emergency responders will know your have animals dependent on you.
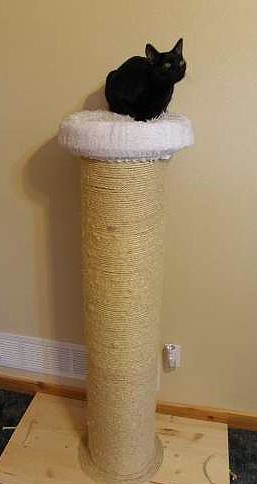
DIY: Super Sturdy Scratching Post From Concrete Form
This is a pretty easy DIY scratching post for your kitties. It’s a little unusual because the column has a wider diameter than most posts. This is not accidental —the creator of the tutorial noticed her cats preferred scratching on things wider than their shoulders.  The post is also extra tall so kitties have lots of room to stretch and it’s weighted with plaster inside so it’s quite stable.  It’s all topped off with a padded perch at the top.
You should be able to find the supplies at a home improvement store—she even provides the parts # for the hardware.  Nice! The author of a different cat post tutorial (linked to bellow) recommends using 3/8″ Brazilian sisal rope because it’s stronger, but more importantly because it’s less heavily oiled than other sisal rope.)  You might also want to try woven sisal which will shorten the time it takes to cover the post.  (I’ve ordered woven sisal from Natural Abode and been very happy with the product, price, shipping, & customer service.  And no, I’m note connected to the company in any way.)
The tools needed aren’t hard to come by either. Â You will need:
- pencil
- hand saw
- screw driver
- drill with 1/8†bit and 1/2†bit
- bucket
- stirring stick for plaster
- mixing bucket for plaster
- scissors
- magnet on a string (for fishing out tools and screws that you drop into the tube)
Don’t miss these other DIY cat trees and scratching posts.
- a Cat Tree
- the Monster Cat Tree
- a Scratching Post


