DIY: Construct A First Aid Kit

Here’s a comprehensive list of things to have in your animal First Aid Kit.  Start with the items marked with a ♥.  (Here’s a printable list for the animal First Aid Kit)

  1. ♥current pet 1st Aid manual (we like The First Aid Companion for Dogs & Cats, by Amy D. Shojai)
  2. ♥contact information for:
    1. your veterinarian
    2. emergency veterinarian
    3. area shelters
    4. ASPCA Animal Poison Control 1 (888) 426-4435
  3. ♥up-to-date weight for your pets
  4. ♥up-to-date information on your pets’ medications
  5. ♥1-2 week supply of all medications pets need
  6. ♥appropriate calming supplement
  7. ♥muzzle or strip of fabric/length of rope for DIY muzzle
  8. ♥non-stick gauze pads
  9. ♥adhesive tape
  10. ♥liquid bandage
  11. ♥self-adhering flexible bandage (Vetrap, Pet Wrap, Kling, Coban)
  12. ♥blunt tipped scissors (for trimming away fur, we like Metzenbaum scissors because they’re curved)
  13. ♥blunt tipped tweezers or hemostats (removing foreign objects)
  14. ♥rectal thermometer
  15. ♥lubricant (K-Y Jelly, Vaseline, etc. for thermometer)
  16. ♥nail clippers
  17. ♥large, clean towel
  18. ♥clean wash cloth
  19. ♥anti-septic solution (Chlorohexidine (.5%), Betadine, not rubbing alcohol)
  20. ♥sterile saline eyewash (flush wounds)
  21. ♥anti-biotic ointment
  22. ♥honey or Karo syrup (for treating shock)
  23. ♥over-the-counter medications approved by your veterinarian with notes on dosages (buffered aspirin (dogs only), Benadryl, Kaolin-Pectin, etc.)
  24. Saran Wrap (seal wounds)
  25. heavy-duty tape (duct, packing, masking, etc.)
  26. splinting material of appropriate sizes (bubble wrap, foam wrap, chopsticks, ruler, thick magazine, etc.)
  27. safety razors (for removing fur)
  28. electric trimmer (for removing fur)
  29. needle nose pliers (removing foreign objects)
  30. large, needless syringe or eye dropper (liquid medications)
  31. bulb syringe
  32. leather gloves
  33. disposable gloves
  34. cotton balls
  35. cotton swabs
  36. cold packs
  37. hot packs
  38. activated charcoal
  39. hydrogen peroxide (3%)
  40. syrup of Ipecac
  41. styptic powder (Kwik-Stop)
  42. Velveeta or Pill-Pockets for hiding pills

DIY: Custom Pet Tee

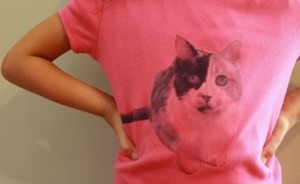
Cute!  Here’s a Pet Tee project for that little someone in your life. (via CRAFT) Ellen over at The Long Thread has a great tutorial on how to make these custom pet tees with pics of your own pets.  She tells you how to photoshop your images and what to do next.  Pretty easy!

You’ll need:

  • digital images
  • computer
  • ink jet printer
  • photoshop or image software
  • iron-on image transfer paper (don’t use the opaque version or the color of the shirt won’t show through the image)
  • iron
  • cotton shirt

If you need help with how to use iron-on transfer paper, check out this video tutorial and this tutorial with some more tips.

DIY: Easy Cooler Coat

Is it toasty where you are?  Some dogs are especially sensitive to heat and others, like my Saffron, often look for shady places on our summer walks.  Your dog doesn’t have to be uncomfortable.

Here’s a great project (from Finland, nifty!) for a DIY version of the cooler coats like the Swamp Cooler, the Keep Cool Coat, or the Cool K-9 Cooling Vest. All of them use evaporative cooling to keep your dog from over-heating, though obviously you shouldn’t rely on it to keep your dog cool in a locked car or anything like that.

Once your DIY Cooler Coat is finished, just soak it in cool water, ring it out lightly, and place it on your dog.

You’ll need:

  • an old towel (try a thrift store if you don’t have one) or terry cloth yardage, amount depends on size of dog
  • seam binder (at least 1.5″ wide)
  • velcro
  • sewing machine
  • thread

The instructions recommend leaving the collar off this pattern when making the Cooler Coat.  They also suggest fitting the velcro closure on the neck before working on the stomach closure.

DIY: Round Recycled Cardboard Cat Scratcher

I’ve always thought I should make my own cat scratchers out of the cardboard boxes we have collected.  It seems crazy to buy cardboard scratchers , because–Hello?!  You want how much for what’s basically pieces of cardboard glued together??!!  But, I also wasn’t thrilled with the prospect of hot-gluing a bazillion strips of cardboard myself.  That would seriously get in the way of reading the subtitles for the Korean dramas to which I’ve gotten addicted.

This lovely tutorial is for a round cat scratcher! You have to coil the strips of cardboard tightly and then just tape the ends.  Sweet!  I can do that and read subtitles–no problem!  You can decorate the outside edge of the scratcher too so it doesn’t look like some freaky hunk of cardboard in your living room.  It’ll look like a decorated freaky hunk of cardboard!