

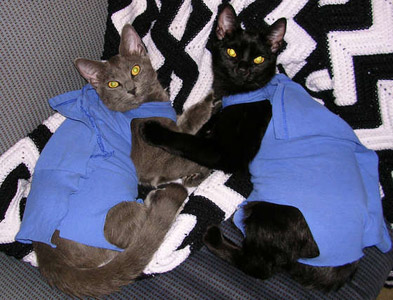
We and our pets know those Elizabethan or lampshade collars are the pits. Here’s a handy do-it-yourself alternative for protecting an incision or wound site on your pet’s torso from Instructables. You’ll find good instructions for making a body sock or “cat jacket” out of an old t-shirt.
This could also be used on dogs, rabbits, ferrets, etc. It might not be enough to stop an obsessive pet from messing with their stitches, but I think it would work with a lot of pets. A side benefit could be that wearing this body sock might help curtail their activity, which is another post-surgery need. Try it out!
Check out these other alternatives to Elizabethan collars:
- the BiteNot collar
- the Neck’s Best Thing
- the Optivisor & the Novaguard
Wow! what a great idea. We recently went thru a few weeks of agony with my poor dachshund stuck in one of those collars. He hated it; so we hated it too. This looks like a much better alternative. I guess you have to take it off for them to pee, tho. Or else cut it a little differently.
I recently tried it on my poor kitty who had gotten sick and the only way to save her life was to spay her. she seemed so miserable with the Elizabethan collar however she was too sore and cried very hard and bit at me till I took it off I will try again in a few days when the ouchieness is gone.
I have great news. I discovered that a dog T-shirt, available in most bigger pet stores, works like charm on cats as an alternative to cones. My cat had a big wound on her flank that needed stitches/staples. The Vet placed a cone on her, and it was so heart-rending. She tried going through our pet door with it, and bounced off. She could not eat or drink with it on, could not clean her fur and barely managed to sleep. My wife and I were miserable, as was my cat.
I visited this site and found references to home-made shirts for cats. Surely, there must be commercially sold shirts for cats. I failed to find any, but I did discover a whole line of T-shirts and sleeveless tank-tops for dogs at our local Petsmart store. I discovered the perfect one … a sleeveless tank-top that fit her well (size medium). Put the legs through the tank top leg openings, and it fit perfectly, without coming off. The bottom of the shirt has elastic so it clung to her body, covering her flank wound completely. She got used to it within an hour, and … NO CONE NEEDED. She could not lick the wound but could lick her face, paws, etc.
A week after her staples were removed, I took off the top. Her wound was completely closed and looked great. She licked it and did no damage because it had so thoroughly healed.
To find your own supply and see what they look like, just do a web search for “dog tank tops”. Hundreds of pictures will appear, and you will see how well these can replace that dreaded cone. Note that this only works for wounds to the cat’s body, not its legs or paws.
Hope this helps!
I used the leg of a pair of sweatpants. Use the cuff as the neck opening. Cut slits for the legs. Women’s small size fits my 8 pound cat, but could use men’s sizes for larger cats. So far is MUCH better than that awful cone.
We have very small cat that we made this for she wouldn’t move, eat, drink or use the litter box. We didn’t have any safety pens and I had to think of a different solution so we made tying strips out of the T-shirt. That we tied close. It made a great idea even better bc all you need is scissors and a T-shirt.
Pictures. Or it didn’t happen.
Thanks for the pics and pattern. Looking for an old tee, I found a long-sleeve one and slipped it on my kitty- it fit nicely. I folded it with the seam on top, measured 3.5†from the cuff and made my front leg holes 1†from the fold- giving a 2†space between front legs. Then I measured the distance between front and back legs- added an inch and positioned my back legs 1.5†from the fold. I cut the leg holes through both thicknesses of the folded sleeve, tried it on and adjusted leg holes as needed. Next I measured around kitty’s neck and body behind her front legs-so I could pin the neck opening smaller and body larger. I sewed this down the length of the sleeve and cut it off 2†past the back leg holes. This can be trimmed to fit later. Kitty was desperate to get it off- so I offered her yummy food and after a snack she just accepted it! I did this before kitty’s surgery, trying it on a few times each day. The way to get it on is to roll it from back to front, slide over kitty’s head and unroll slowly over front paws then to back paws. While kitty was at the vet I did sew trim around each leg hole- made out of the stretchy tee shirt material. My kitty loves to eat thread so I had to finish these holes. You might not have this problem- so you would not have to finish them. And there’s 2 sleeves on a shirt, so after the first one is made and used, make a spare one adjusting the sizing if needed.
Kitty was in the collar (my vet insisted) and homemade body suit- the collar kept her from climbing but I took it off after 2 days. Kitty has never tried to get out of her body-suit. It covers her wound and she can use the litter just fine. I like the seam running along her back- it is the perfect handle to grab and pick her up by when she’s trying to climb… tried to include pics but not able to…