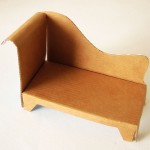
DIY: Cardboard Catnip Castle For Your Wall

I think this happens every Fall.  The days start getting shorter and somehow my I’ve-Got-To-Make-Something! button gets pushed.  Here’s the first DIY post in a long time—how to make a cardboard cat “tower” that hangs on your wall.

This is a great idea, since it doesn’t take up floor space, doubles as a cat scratcher, doesn’t cost much to make, can be customized, and can double as art.  How cool is that?!  You can use cardboard you have or you you can buy sheets of it.  I would treat the “face” of the cardboard (the part that faces the room) so that it’s more aesthetically pleasing by painting it or by applying wallpaper, decorative paper, or fabric.  This tutorial shows how to make your cat a happy camper!

You’ll need:

  1. jigsaw
  2. glue gun
  3. Corrugated cardboard pads measuring 36″×48″ (The tutorial notes these are available in bundles of 50 from http://www.uline.com/.) Or you can use what you have on hand as long as you have enough to make your piece 35 sheets thick. You may have to adjust the shapes you make depending on what you have.
  4. hand saw or reciprocating saw
  5. 3/8″ and 9/32″ wood drill bits, 6″ or longer
  6. power drill
  7. (4)–3/8″ washers, 2″ diameter
  8. ratchet with 1/2″ socket
  9. (4)–8″×3/8″ lag bolts
  10. pencil
  11. carpenter’s glue
  12. paint brush
  13. wallpaper brush
  14. trim guide
  15. sharp utility/camping knife
  16. level
  17. 48″ ruler
  18. heavy objects to weigh down glued boards

DIY: Easy Cooler Coat

Is it toasty where you are?  Some dogs are especially sensitive to heat and others, like my Saffron, often look for shady places on our summer walks.  Your dog doesn’t have to be uncomfortable.

Here’s a great project (from Finland, nifty!) for a DIY version of the cooler coats like the Swamp Cooler, the Keep Cool Coat, or the Cool K-9 Cooling Vest. All of them use evaporative cooling to keep your dog from over-heating, though obviously you shouldn’t rely on it to keep your dog cool in a locked car or anything like that.

Once your DIY Cooler Coat is finished, just soak it in cool water, ring it out lightly, and place it on your dog.

You’ll need:

  • an old towel (try a thrift store if you don’t have one) or terry cloth yardage, amount depends on size of dog
  • seam binder (at least 1.5″ wide)
  • velcro
  • sewing machine
  • thread

The instructions recommend leaving the collar off this pattern when making the Cooler Coat.  They also suggest fitting the velcro closure on the neck before working on the stomach closure.

DIY: Round Recycled Cardboard Cat Scratcher

I’ve always thought I should make my own cat scratchers out of the cardboard boxes we have collected.  It seems crazy to buy cardboard scratchers , because–Hello?!  You want how much for what’s basically pieces of cardboard glued together??!!  But, I also wasn’t thrilled with the prospect of hot-gluing a bazillion strips of cardboard myself.  That would seriously get in the way of reading the subtitles for the Korean dramas to which I’ve gotten addicted.

This lovely tutorial is for a round cat scratcher! You have to coil the strips of cardboard tightly and then just tape the ends.  Sweet!  I can do that and read subtitles–no problem!  You can decorate the outside edge of the scratcher too so it doesn’t look like some freaky hunk of cardboard in your living room.  It’ll look like a decorated freaky hunk of cardboard!

Green Roof Round-Up

A few issues ago, Sunset magazine had an article on how to plant a vertical garden to create a lush, tropical look. It reminded me of how much I like the look of green roofs done nicely.  I love the aspect of pointillism in the ones planted with succulents, but I like how they also look like an aerial view of some amazing garden.  (Sunset also has an article on a vertical garden with succulents.)

I don’t think cats or dogs should just be left outside, but even pets who spend most of their time indoors may need some shelter from the heat or rain when they are outside. A house with a green roof would work great and look nifty too.

Want to build your own?  I have two posts on DIY Green Roof dog houses.  Be sure you get a safe version of pressure treated lumber, or use naturally rot-resistant wood like cedar or cypress, or plastic lumber.

The first project is for a veranda with open sides and a raised floor.  Love it!

The second project is for a pretty simple, but cute house.


If you’re not handy, you can buy a green roof dog house from Sustainable Pet. They’re pretty expensive, but I think prices have come down some since I first wrote about them.  They have some fun design ideas.

So what’s so cool about green roofs?  Greenroofs.org has a TON of information on the benefits of green roofs. Briefly, green roofs:

  • provide thermal and sound insulation
  • reduce rain run-off
  • are aesthetically appealing
  • reduce energy use
  • absorb CO2
  • reduce heat islands

Of course, a green roof dog house alone won’t save the planet, but:

  • it can get you thinking about green roofs
  • you can use it as a small scale test for a larger roof—which plants work in your area, try different planting mediums, etc.
  • your dog will have a cooler or drier place to hang out
  • you can show people what a green roof is & looks like
  • create more gardening space at your home

Earth Day DIY Round-Up: Rethink, Repurpose, Recraft!

socksweater-copy

We can do more than just Reduce, Reuse, Recycle—we can help the environment and ourselves by “upcycling” things we can no longer reuse.  Plastic grocery bags with too many holes become crinkly stuffing for cat toys.  A sad, old pillow is transformed into a pet bed.  A funky, old candy dish on a pedestal becomes a fancy, raised water bowl.  Try using your imagination before you go out to buy new things for your pets.  You might already have something around the house that will work as well or better than something new.  Save money, help save the planet!

Some of my favorite DIY projects that Rethink, Repurpose, Recraft!

Beds & Furniture:


Clothing:


Poop: